
Awesome JavaScript Popups in Your Captivate Project
In this video tutorial, I show you a solution to a question from the Adobe forums. The user wants to open a link to a web URL in a new window but doesn't want all the gobbledygook that comes with a modern browser
In this video tutorial, I show you a solution to a question from the Adobe forums. The user wants to open a link to a web URL in a new window but doesn't want all the gobbledygook that comes with a modern browser (no tabs, no menus, no bookmark bars, etc.). I did some research and learned a little about the window.open() command in JavaScript. It works well. I managed to get it to work for a couple of scenarios in this training. Here is the URL of the website where I learned about the Window.open JavaScript command.
Here is the link that explains how to use this command https://www.w3schools.com/jsref/met_win_open.asp

Drag and Drop in Your Adobe Captivate Software Simulations
Here is my solution when you wish to have your learners perform the full motion drag and drop themselves.
By default, Adobe Captivate Software Simulation converts your drag and drop actions into full motion recordings (FMR), which is excellent if you are creating a "Watch Me" Demo, but what happens when you want to create a fully interactive "Try Me" Training? Here is my solution when you wish to have your learners perform the full motion drag and drop themselves.

New Assets Window and Quick Start Projects in Captivate 2019 Update 2 (ver 11.5)
In this video tutorial, I take you on a tour of the new Assets Windows in Adobe Captivate 2019 version 11.5. Also, I show you how you can insert slides from different Quick Start Projects and how you can customize the Quick Start Projects to suit your needs.
In this video tutorial, I take you on a tour of the new Assets Windows in Adobe Captivate 2019 version 11.5. Also, I show you how you can insert slides from different Quick Start Projects and how you can customize the Quick Start Projects to suit your needs.

eLearning Livestream - L&D Lessons Learned | July 1st, 2019
Tune in Monday, July 1st at 12:00 EDT | 16:00 UTC for another eLearning livestream. This time we will be discussing L&D lessons that you have learned.
Tune in Monday, July 1st at 12:00 EDT | 16:00 UTC for another eLearning livestream. This time we will be discussing L&D lessons that you have learned. Please share your ideas for this topic and more specific examples with me in the comments below or the comments over on YouTube. If you wish to participate in the live chat, be sure to watch the live stream on YouTube here: https://youtu.be/_CebjDMKN0I

Multiple Interactive Video Overlay Slides in Captivate 2019 Update 2
In this video tutorial, I show you how you can now add multiple overlay slides such as knowledge checks to a single point on your Interactive video's timeline.
In this video tutorial, I show you how you can now add multiple overlay slides such as knowledge checks to a single point on your Interactive video's timeline. If you wish to follow along with this tutorial, I merely used the sample project that can be found in the Resources tabs. Remove the existing bookmarks and overlays to follow along with the tutorial or experiment with the feature yourself.

Update Missing Fonts in Captivate 2019 Update 2
In this video tutorial, I show you the process to follow if you are missing fonts such as the ones you might get from Adobe Fonts. I also show you how you can replace existing fonts throughout your course with something new just by performing a couple of easy steps.
About a year ago, a client sent me an Indesign file. When I opened it, I was prompted with a dialog instructing me to resolve the missing fonts from this document. I remember thinking at the time, I wish Adobe Captivate did the same thing. Well, good news. Now it does. In this video tutorial, I show you the process to follow if you are missing fonts such as the ones you might get from Adobe Fonts. I also show you how you can replace existing fonts throughout your course with something new just by performing a couple of easy steps.


Easy Custom Table of Contents (Branching) in Captivate 2019 Update 2
In this video tutorial, I show you how you can create a branching menu slide that automatically allows your learners to navigate to different sections that have been grouped by you in Adobe Captivate.
In this video tutorial, I show you how you can create a branching menu slide that automatically allows your learners to navigate to different sections that have been grouped by you in Adobe Captivate. This interaction also keeps a final quiz button hidden until your learners have visited all the prerequisite sections. This easy to create eLearning design doesn't require any variables or advanced actions.
Here are the steps to reproduce it yourself:
Label your branching slide "branching"
Create interactive objects with no action and label them for each intended section. Optionally you can add visited states to these buttons if you want to show completion as I have done in this video
Create a final interactive object for your quiz and label it "quiz" and make it not visible in output
Group your slides into sections and label them precisely the same as your interactive objects from the branching slide, including the one for the quiz

Easy Forced Navigation in Captivate 2019 Update 2
Have you ever had to create a click to reveal interaction where the continue or next button remains hidden until the learner clicks all the items? Traditionally this would require multiple user variables to track what has been clicked and multiple conditional advanced actions to do all the programmatic stuff behind the scenes. This was time-consuming and not something new Captivate users found easy to do. This just got super easy with Adobe Captivate 2019 Update 2 (version 11.5).
A common request we get from our stakeholders is the idea of a multi-state object click to reveal but with a hidden continue or next button, sometimes known as forced navigation. This traditionally requires that you create a variable for each button-click to keep track if the learner has clicked on that item, as well as an advanced conditional action that performs the state change but also checks if all the items have been clicked before showing that continue or next button. That means in a six button click to reveal you need six variables and six conditional advanced actions. If you are curious or are still using Adobe Captivate 2017 or older, here is an example of how I used to create such interactions:
Hide the Next Button in Captivate Until Learners Do Something First
Today there is an easy way to do this with Adobe Captivate 2019 version 11.5 or newer. Even with this smooth workflow, there are some rules you must follow. I've attempted to write them out to make this easy for you to do on your own.
Step 1. Label Your Slide
First, you must label your slide multistate. Don't worry if your on-screen title needs to be something else. This lets Captivate 2019 know that this sort of interaction is going to be on this slide.
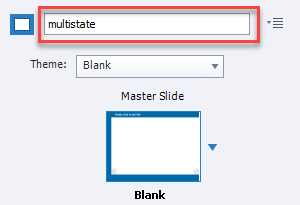
Slide Label in the Slide Properties Inspector
Step 2. Label Your Multi-state Object
Second, you must label your multi-state object ms_ followed by the name you wish to give this interaction. For example, I'm calling mine ms_impacts. Your multi-state object can contain additional objects as mine does. I have a smart shape with text, and with each state, I've also included an image. Both the smart shape with text and image change with each click.

Multi-state object label
Step 3. Label Your Buttons
You must create the same number of buttons as you have other states in your multi-state object. These need to be precisely labeled according to the name of all the states in your multi-state object. In my example, I have the following states in my multi-state object.

The state names in the multi-state object
I created six buttons each set for "no action" to represent all the states in ms_impacts. Label each shape button <interaction name>_<state name>. In other words, I labeled my first button impacts_workgroup_conflicts, and so on.

Labels for the shape buttons
Step 4. Label Your Hidden Next Button
Lastly, make sure you have a next or continue button that you have labeled <interaction name>_completed. For my example, I'm using an arrow button to advance, and I've selected the Not visible in output icon and labeled it impacts_completed as you can see below.

Label your hidden next button
If you follow the correct labeling conventions of all of these items, this should work exactly like the more complicated interactions we used to create in the past. Both interactions behave the same, but the difference is that this method takes only minutes to create, whereas the older, more complicated process took longer. You can have as many of these interactions within a single project as you wish, so long as you follow the naming conventions. I can't see why I would use the conditional advanced actions method when I now have such an easy process.
Exclusive to my Patreon subscribers you can download the project file used in the creation of the this video.

Images as Buttons in Captivate 2019 Update 2
In this video tutorial, I show you a couple of ways the new images as buttons feature can be used in your eLearning development workflow. In addition, this video covers a bonus feature in the form of being able to not only use SVG files as buttons but be able to edit the fill color of your SVG images as well.
In this video tutorial, I show you a couple of ways the new images as buttons feature can be used in your eLearning development workflow. In addition, this video covers a bonus feature in the form of being able to not only use SVG files as buttons but be able to edit the fill color of your SVG images as well.
As I say in my video this is probably the most undervalued update to Adobe Captivate 2019, however when I think of the hundreds of shapes used as buttons or regular image buttons I've used over the years that have provided an unsatisfying result, I'm very excited to see how this speeds up my development process.
Please note that I recorded this video with prerelease copies of the software and there may be differences in how the final release version looks and behaves.

Copy and Paste Appearance in Captivate 2019 Update 2
I like to think of this new feature as the format painter for Adobe Captivate. In this video tutorial, I show you how the new Copy and Paste Appearance feature works in Adobe Captivate 2019 Update 2.
I like to think of this new feature as the format painter for Adobe Captivate. In this video tutorial, I show you how the new Copy and Paste Appearance feature works in Adobe Captivate 2019 Update 2.
Please note that videos such as this one were prepared in advance using the prerelease version of Adobe Captivate Update 2. There might be subtle differences in the appearance or functionality of the final publicly available software.