
Make Your Hidden or Disabled Next Button Available Right Away on Slide Revisits
In this video tutorial, I will show you how you can use advanced actions to program a click-to-reveal interaction. Also, this tutorial will show you how you can disable the next button until the learner completes the click-to-reveal. Still, the real kicker is that Captivate will remember that the learner has completed the interaction on subsequent slide revisits and make the Next button available right away.
In this video tutorial, I will show you how you can use advanced actions to program a click-to-reveal interaction. Also, this tutorial will show you how you can disable the next button until the learner completes the click-to-reveal. Still, the real kicker is that Captivate will remember that the learner has completed the interaction on subsequent slide revisits and make the Next button available right away.
Patreon subscribers can download the project file for free. Join my Patreon channel here: https://www.patreon.com/paulwilsonlearning

Show Delayed Next Buttons Immediately on Slide Revisits in Adobe Captivate
In this Adobe Captivate tutorial, I will show you how you can use a shared action to delay the appearance of your Next buttons across all your slides but make them immediately available on slide revisits.
Has this happened to you? Your stakeholder has asked you to delay the appearance of the Next button on your slides in your Adobe Captivate eLearning project to ensure the learners view all their valuable content. They review the course and then realize that when they return to previously visited slides, they are now frustrated by the Next button's delayed appearance. What's an eLearning developer to do? In this Adobe Captivate tutorial, I will show you how you can use a shared action to delay the appearance of your Next buttons across all your slides but make them immediately available on slide revisits.

Easy Forced Navigation in Captivate 2019 Update 2
Have you ever had to create a click to reveal interaction where the continue or next button remains hidden until the learner clicks all the items? Traditionally this would require multiple user variables to track what has been clicked and multiple conditional advanced actions to do all the programmatic stuff behind the scenes. This was time-consuming and not something new Captivate users found easy to do. This just got super easy with Adobe Captivate 2019 Update 2 (version 11.5).
A common request we get from our stakeholders is the idea of a multi-state object click to reveal but with a hidden continue or next button, sometimes known as forced navigation. This traditionally requires that you create a variable for each button-click to keep track if the learner has clicked on that item, as well as an advanced conditional action that performs the state change but also checks if all the items have been clicked before showing that continue or next button. That means in a six button click to reveal you need six variables and six conditional advanced actions. If you are curious or are still using Adobe Captivate 2017 or older, here is an example of how I used to create such interactions:
Hide the Next Button in Captivate Until Learners Do Something First
Today there is an easy way to do this with Adobe Captivate 2019 version 11.5 or newer. Even with this smooth workflow, there are some rules you must follow. I've attempted to write them out to make this easy for you to do on your own.
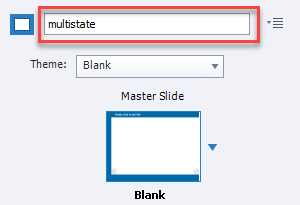
Step 1. Label Your Slide
First, you must label your slide multistate. Don't worry if your on-screen title needs to be something else. This lets Captivate 2019 know that this sort of interaction is going to be on this slide.
Slide Label in the Slide Properties Inspector
Step 2. Label Your Multi-state Object
Second, you must label your multi-state object ms_ followed by the name you wish to give this interaction. For example, I'm calling mine ms_impacts. Your multi-state object can contain additional objects as mine does. I have a smart shape with text, and with each state, I've also included an image. Both the smart shape with text and image change with each click.

Multi-state object label
Step 3. Label Your Buttons
You must create the same number of buttons as you have other states in your multi-state object. These need to be precisely labeled according to the name of all the states in your multi-state object. In my example, I have the following states in my multi-state object.

The state names in the multi-state object
I created six buttons each set for "no action" to represent all the states in ms_impacts. Label each shape button <interaction name>_<state name>. In other words, I labeled my first button impacts_workgroup_conflicts, and so on.

Labels for the shape buttons
Step 4. Label Your Hidden Next Button
Lastly, make sure you have a next or continue button that you have labeled <interaction name>_completed. For my example, I'm using an arrow button to advance, and I've selected the Not visible in output icon and labeled it impacts_completed as you can see below.

Label your hidden next button
If you follow the correct labeling conventions of all of these items, this should work exactly like the more complicated interactions we used to create in the past. Both interactions behave the same, but the difference is that this method takes only minutes to create, whereas the older, more complicated process took longer. You can have as many of these interactions within a single project as you wish, so long as you follow the naming conventions. I can't see why I would use the conditional advanced actions method when I now have such an easy process.
Exclusive to my Patreon subscribers you can download the project file used in the creation of the this video.