Tiny App Tuesday #4 - Oracle VM VirtualBox
As an eLearning designer, developer I sometimes need to install software to create software demos, or assessment through software simulation. If you’re like me your main PC or Mac is super important to your business. I’m not crazy about installing software on my computer without really knowing what impact it will have on my other software that is essential to my business.
The solution to this problem is to install virtual machines on your computer. A virtual machine is a software simulation of a computer system. I first got interested in virtual machines when I had a need to install Macromedia Captivate 1.0, which just doesn’t install on a modern OS like Windows 10. I needed to be able to install Captivate 1 on an operating system from the early 2000s. I selected Windows XP as I had on old unused license for XP but there was no way I was going to wipe my hard drive on my 2019 top of line laptop to install Windows XP. It’s very likely it wouldn’t work anyway. VMware is a company that produces software to emulate a full PC but it’s a professional application that requires a paid license to maintain. My needs were minimal so I looked for a more affordable solution.
I found that Oracle produced VirtualBox, an open sourced virtual machine application that anyone can download, install and configure a virtual PC to run any operating system and subsequent software you need. The best part is that other than taking up some space on your computer storage, these virtual machines have no impact on your main computer and you can delete the virtual machines when you are through with them.
Another benefit of VirtualBox is that you can install it not only on a Windows machine, but you can install it on MacOS and Linux to emulate a variety of OS and software that may not normally be available to your computer in its current configuration.
Once you have installed VirtualBox you can merely click on the New icon to begin the process of creating your virtual machine.

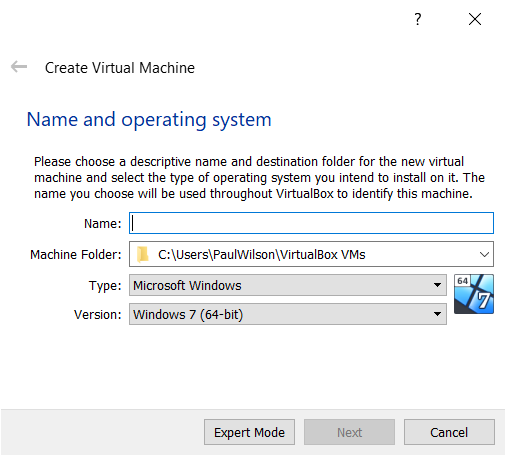
The first thing you need to do is give your virtual machine a name and identify what Operating System you intend to install. You can select from Windows, Linux, Solaris, BSD, OS/2, Mac OS X, and possibly others.
You will then need to configure how much of your system RAM you wish to let your virtual machine “borrow.“ The default for a Windows 7 machine is 2GB but you can increase this to what you need. Obviously using all your actual system memory might impact the performance of your machine while running the virtual machine so keep that in mind.
Next, you will select or create a virtual hard disk. VirtualBox will recommend a size based on the operating system but you can increase this if you anticipate more space needed for additional software. For example, a Windows 7 virtual machine recommends a 32GB drive but I usually increase this to 50GB. There are several hard disk file types you can select. I always select the default VDI format which is a VirtualBox Disk Image format but you can select one of the two other formats if you have a need.
If you select the VirtualBox Disk Image you can also select to make the size dynamic. In other words, the virtual drive will grow as it is used. I almost always select Dynamically allocated but if you don’t want the virtual disk to take more than what you previously allocated you can select a fixed size.
Once you’ve selected all the parameters of your virtual machine it’s like having a blank computer with no operating system. You will need to provide an installation disk to virtually place in the virtual machine’s optical drive to install. Scroll down to the Storage section of your new virtual machine and click on the Optical Drive to either choose a disk image or disk file. You can select ISO files like the ones you can download from Microsoft, or other formats such as DMG, CUE, VISO, RAW, and more. For a Windows OS you will likely have an ISO.

While writing this article I downloaded the original file to install Windows 8.1 on my older laptop (just for testing purposes). I then clicked on Start from the VirtualBox Manager interface and within 20 minutes or so, I was able to have a virtual version of Windows 8.1 running on my VirtualBox.